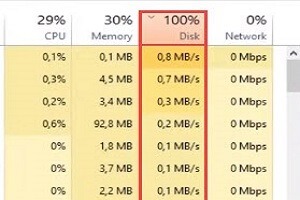
Probably many windows 10 users may have faced windows 10 100% disk usage problem on startup or during system running and I also faced this issue several times during my PC work but we can easily fix this problem by doing some good tweaks to windows 10 and by upgrading hardware of our computer mainly RAM and Storage drive.
This problem is more common in windows 10 and impacts your overall computer performance like during system startup its takes very long time to shows windows screen, very slow loading of windows tray icons, and sometimes the system unresponsive and automatically restart explorer.exe. If this problem persistently for 5 to 10 minutes after system bootup then something is definitely not good in your system.
Many possible solutions for Windows 10 100% disk usage like fixing StorAHCI.sys Driver, Disabling some windows 10 services or trying third-party software to fix this problem but hardware-related issues are also responsible for this 100% disk usage especially if the system running on low RAM, old processor, and a low profile HDD.
How many reasons are responsible for windows 10 100% disk usage
- Hardware Reasons
- System Reasons
Hardware Reasons
Several hardware reasons are causing 100% disk usage issue but three main reasons are directly connected to this problem
System running on low RAM
RAM (Random Access Memory) that used to read, write, and changed data in any order, basically, used to store working data and machine code.
So, when your system bootup windows 10 which is already running on low RAM. Then, obviously high disk usage problem occurred because during system startup windows load all resources, startup programs, background process, and services with higher priority. It can also mean this, your hard disk not running fast as your RAM needs, and your system also needs more RAM to read and write a large amount of data.
We know that windows 10 is much more advanced than its previous versions but it also uses more data, storage, and more resources to run on a system. Low RAM of a computer is also causing this issue, I recommend at least 4 to 8 GB of RAM with maximum MHz supported by your system to run windows 10.
System needs more powerful Processor
We know that without RAM, Processor, and a Storage device we can’t run a computer system and Processor play a very important role to run a PC faster if we need a more powerful computer then we need a more powerful processor.
Basically, many old laptops or desktop computer has old processors which are released almost 6 to 8 year ago but today, all type of OS whether it is Windows, macOS, Android or iOS all have upgraded its framework massively. Now, these OS are much larger in data size including many types of services that need more resources than before to run within a system.
This is a major cause of high disk usage on a computer because of an old processor. I recommend used at least a medium to high range profile processor which is not old for more than 2 years.
Switch HDD to SSDs
If your system OS running on an (HDD) Hard disk drive you should be replaced with an (SSD) Solid-state drive you might know that SSDs have more data read/write speed because it uses integrated circuit assemblies to store data and more reliable than an ordinary HDD.
High disk usage issue is mainly related to your storage device if you are sure that changing all possible system configurations not work for you then you must upgrade your internal storage device and after that, you will see that 90% of the problem will be fixed. You also make sure that your system drive has sufficient space to run windows freely.
These are some main hardware issues due to which this high disk usage problem occurs in your system again and again after system restart or during system running.
System Reasons
If you have already a high-end PC or Laptop and this issue is still occurring on your system then maybe some system configuration and settings changes will work for you.
Try below system tweaks one by one and see which system configurations are work for you.
Fixing configuration of StorageAHCI.sys driver
First, check the configuration of your AHCI PCIe. AHCI is a short form of Advance Host Controller Interface. It is a technical standard that defines your SATA Host Controller which is used to connects your hard drive. Due to some firmware bug, the storage device doesn’t properly complete input/output when Message Signalled Interrupted (MSI) mode is enabled or some issue with inbox AHCI driver called StorAHCI.sys and leading to high disk usage.
To fix this issue first see if you’re running in inbox AHCI driver.
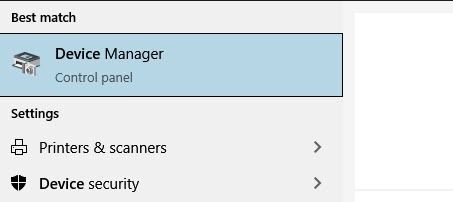
1. Go to Windows search and type Device Manager and Open it.
2. Now, search for IDE ATA/ATAPI controller and click on the arrow to expand it.
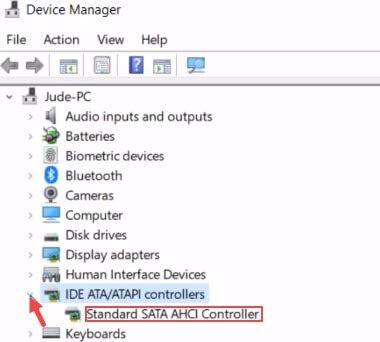
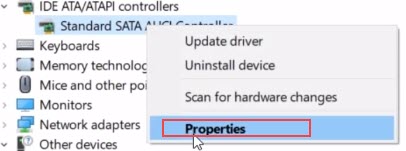
3. If you see Standard SATA AHCI controller then Right-click on it and select Properties.
4. Now go to Driver tab and click on Driver Details if you find a file ending with storahci.sys then you are running in the inbox driver.

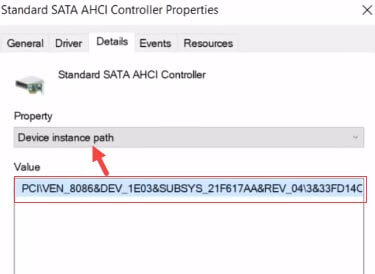
5. Now close the tab and go to Details tab then on the Properties drop-down select Device instance path and then copy or take a screenshot of the value.
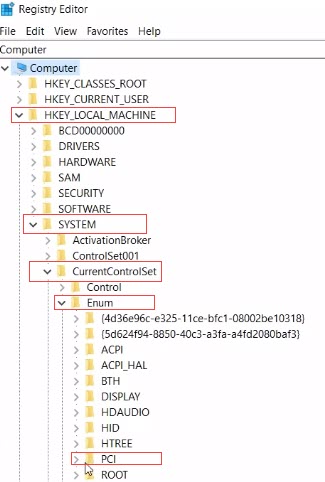
6. After that we need to Disable MSI mode in registry to do that go to Search and type Registry and click on Registry editor and open it.

7. Then, carefully go to HKEY_LOCAL_MACHINE > System > CurrentControlSet > Enum > PCI and then search for the driver value you copied before.
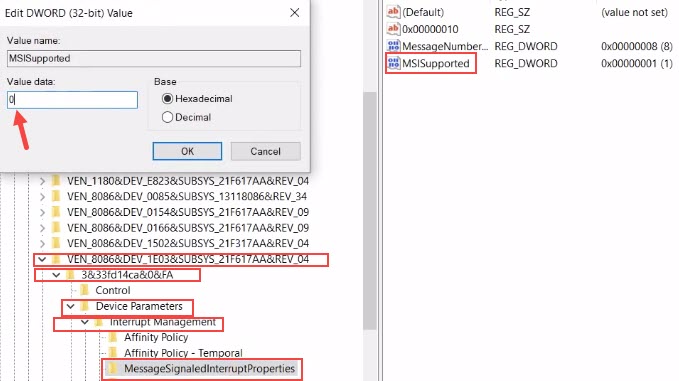
8. Then, expand the value folder and go to Device Parameters > Interrupped Management > MessageSignaledInterrupedProperties and then Double click on MSISupport on the right side and change the value data from 1 to 0 hit OK, and close the registry.
Now Restart your computer and see if the problem has been resolved or not.
Disabling Windows Search Service
Now, this sounds might bit weird but the windows search service is design to quickly access files, folders, and applications which all are on your hard drive. The search service constantly indexes your files on your disk so you can instantly access any files present on your hard disk. This problem happens when windows running on a slow HDD which most of the space is used and because of this windows search constantly running its service with higher priority.
You can temporarily disable this service so you can decide whether you are not reenabled this feature depending on this tweak solves your problem.
1. Go to Search and type Services and open it.
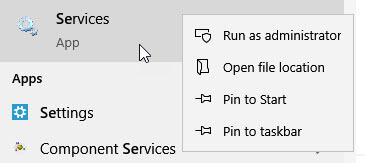
2. Now, search for Windows search and Right-click on it and go to Properties and in properties dialogue box go to Startup type and select Disabled then, Apply and OK.

Now, Restart your computer and see if the problem fixed or not.
Check Disk defragmentation configuration
Defragmentation as you may already know consolidates fragmented files on disk and enables quick access to storage locations however sometimes this process could get corrupted by a recent malware attack or any third-party application hence the windows try to solve this problem but due to corruption it can’t be resolve and leading to 100% disk usage.
To rectify this, you need to stop and disable the services by using the Task Scheduler.
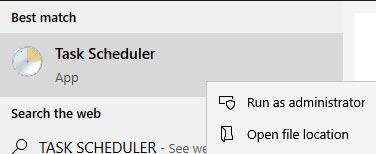
1. First, go to Search and type Task Scheduler and open it.
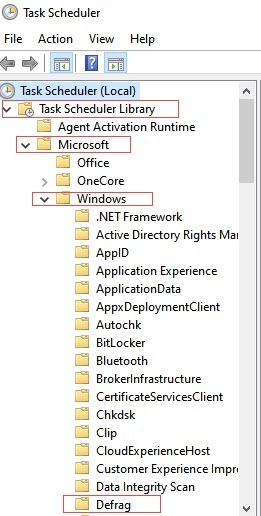
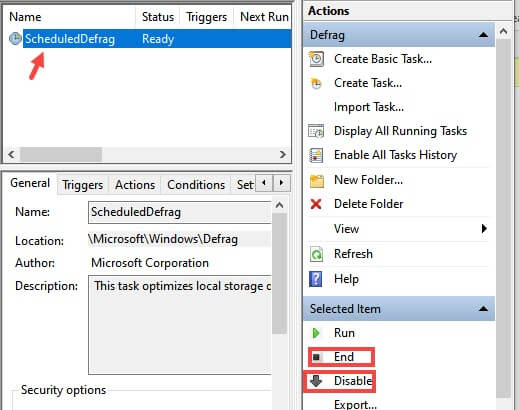
2. Now click on the arrow next to task scheduler to expand it then, go to Microsoft > windows > Defrag. Now, you see an item named ScheduleDefrag click on it and now you can take action by commands on the Right side
3. Click on End and click Yes then, click on Disable, and then this feature is disabled. Now close the Task scheduler and Restart your computer.
If the problem persists then again follow the above steps and start the defragment service.
Disabling Google Chrome settings
Many times after opening google chrome 100% disk usage problems occur, especially in low spec PC. This happens due to google chrome uses more resources to run its services in the system and If you also noticed that this problem occurred because of google chrome then, try a simple tweak to fix this issue.
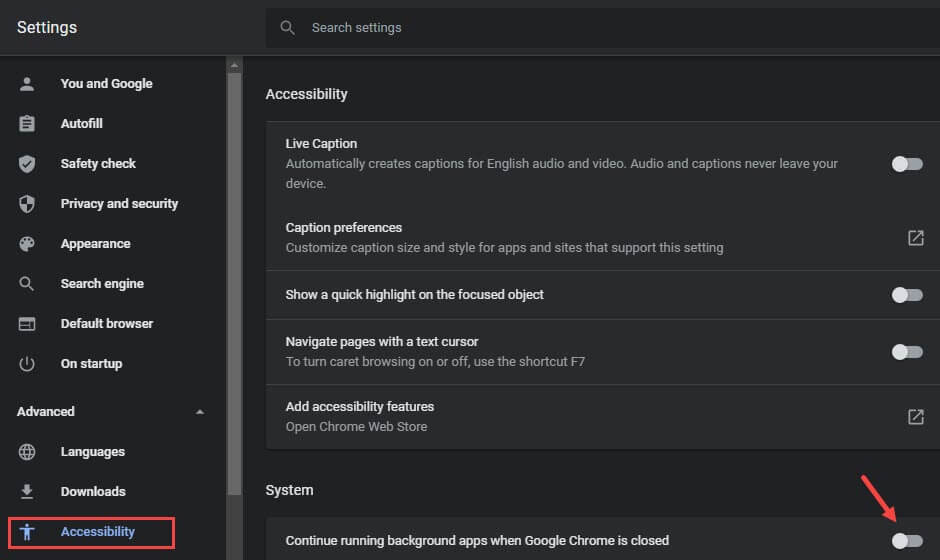
1. Open your chrome then go to Settings > Advanced then search for “Continue running background apps when Google Chrome is closed” and turn off this service and close your google chrome and now check your disk usage.
Disabling Superfetch (SysMain) service
Superfetch or you can say SysMain is Windows service running in background to decrease boot time and launch preloaded app much faster but sometimes this service uses high system resources and causing 100% disk usage.
Disabling this service may decrease the chances of a high disk usage problem.
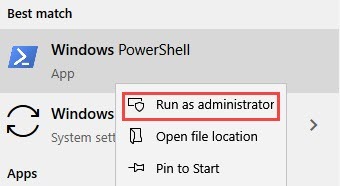
1. For doing this simply, go to search and type Windows Powershell and run as Admin.
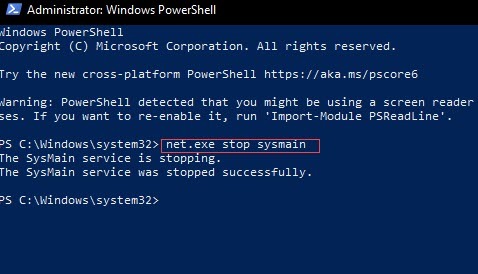
2. Type net.exe stop sysmain and hit Enter to stop this service and Reboot your PC to check whether or not this trick works for you.
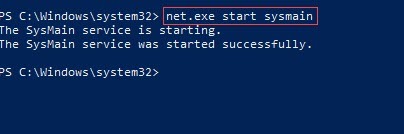
3. If the problem not fixed then again open Powershell and Type net.exe start sysmain and hit Enter to start this service again.
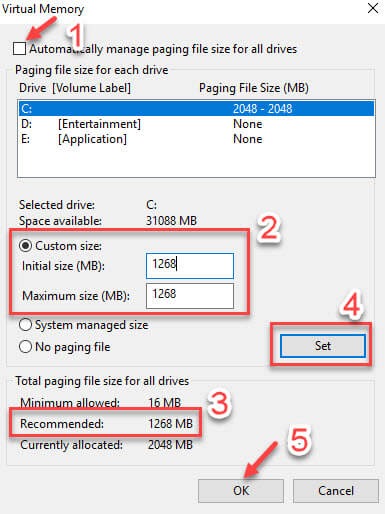
Reset your Virtual memory
Virtual memory is a part of your hard drive or SSD which is own by your system to provide more memory for your RAM when required. When your system RAM is not enough to perform a task then, Windows will automatically store files in virtual memory temporarily and swap them back to RAM when RAM memory free enough from other data.
Windows automatically manage paging file size but you can reset your system virtual memory manually and for doing this.
1. Go to your This PC icon and Right-click on it and select Properties then click on Advanced system settings or you can simply type Advance system settings on Search and Open it.

2. After that, click on Settings of Performance and go to Advance tab and then click on Change.
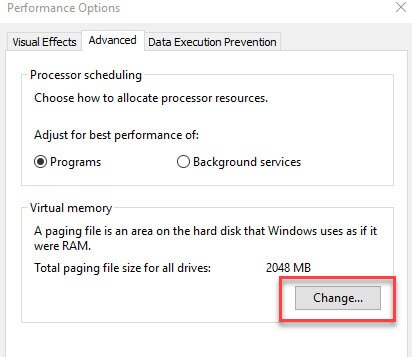
3. Now, Untick the “Automatically manage paging file size for all drives” and select Custom size and type Recommended number in both boxes of Initial size and Maximum size.
4. Then, click on Set and OK then click on Apply and OK and Restart your PC.
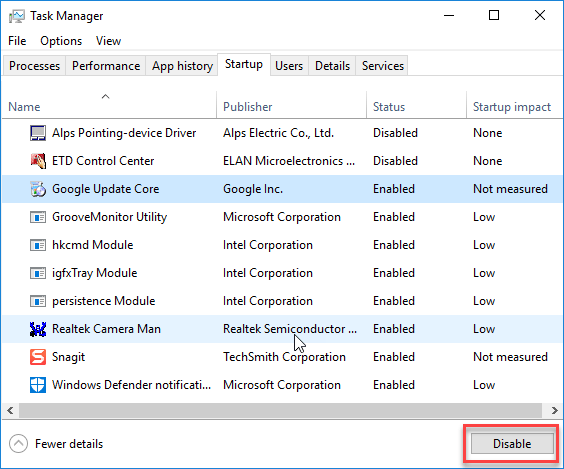
Disable the Startup Program and Services
You probably know that whenever you install any application in your system the application default setting of startup is set to be running Automatically during system boot-up.
if you disable some unused application programs and services during startup it’s not only boost your computer speed but also fix high storage usage problem.
1. First, press the CTRL+Shift+Esc button at the same time to open Task Manager then go to Startup tab and Disable unused startup programs by Right-clicking on it.
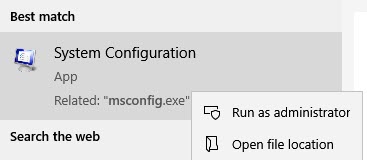
2. After that, close the task manager and go to Windows search and type MSConfig or System configuration.
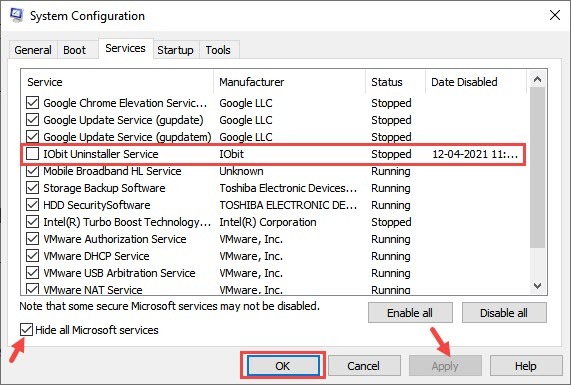
3. Then, go to Service tab and check on “Hide all Microsoft service” then Untick the unused services or unknown services and click on Apply and OK and Reboot your PC to apply the changes.
Check disk for any errors
Performing a disk check is good practice because of some serious error of hard disk causing this 100% disk usage issue.
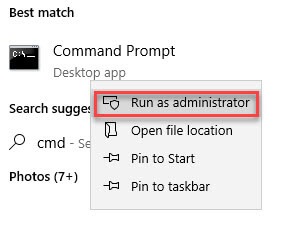
1. For performing disk check go to search and type CMD and run as Admin.
2. Then, type chkdsk.exe<space> /f<space> /r and hit Enter.
3. Then type Y and hit Enter to start this process after the next system Restart.
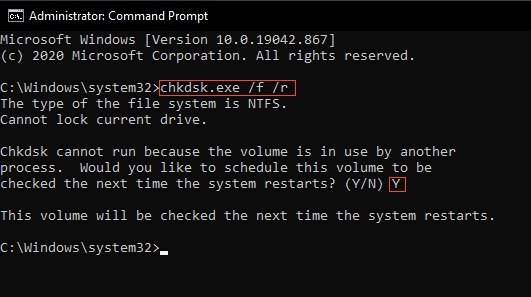
After that, Reboot your PC to start the Disk check.
You may also like:
- Best ways to restore Windows 10 to previous date
- Best malware analysis tools and techniques
- How to make internet faster on Windows 10
Conclusion
No, doubt that the 100% disk usage problem is a very annoying problem in Windows 10 but there are several ways to fix this issue but first we need to identify which reason causing this issue hardware and system reasons both can be responsible for this issue. If you are not sure then, follow the above configurations one by one and see which method is working for you. You can also change your RAM, Processor, and Hard disk to SSD to increase system speed. In my case, this problem was fixed after I upgrading my RAM and Hard disk to SSD.