We know that ,everybody needs a fast internet connection and for this, we also spent lots of money but what we need is not always available for us and if anyone cannot fulfill their work or any task due to slow internet connection, then I can understand how would feel at that time but if we apply some tricks or best settings in our windows to speed up internet so our internet speed is much faster than before.
Windows 10 is an advanced version of windows compares to other windows but it uses more internet than others because in windows 10 there are lots of services used an internet connection to keep data up to date in the background. We need to disable or change some settings so that we could use the entire internet speed only for our work.
Before starting I want to say that internet connection speed mainly depends on your broadband and what type of connection you use. So, make sure that your internet provider gives you proper internet speed or if you have limited bandwidth then I recommend you to change your bandwidth or internet service provider.
But even this practice is also not solving your internet speed issue so, In this detailed guide I will show you many tricks or best settings to improve internet speed and after applying these methods, your internet speed will definitely increase to somewhat and you can also read my previous post that how to make your computer faster.
So let’s start
First, check your browser and if you find huge amount of history, cache, cookies then clean it sometimes it collected in many MBs and make your browser slow.
How to make internet faster with the help of Windows Command Prompt.
Method 1: We use Netsh (network shell) command in CMD which help to modify and reset the network configuration.
Netsh (network shell) used for reset TCP/IP or change the IP address. It first introduced in Windows 2000. This configuration will not increase your net speed blazingly but it changes some configuration to your network which helps to make your internet faster to some extent.
Remember that some of the commands will not work for everyone
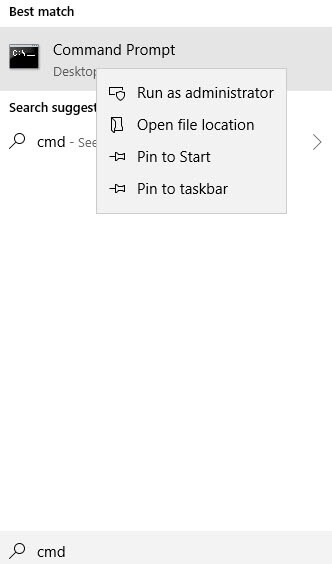
1. Type in your windows search box CMD and right click on it and select Run as administrator.
2. After that, type netsh int tcp show global and hit enter.
3. Now type, netsh int tcp set global dca=enabled and hit enter
4. Now type, netsh int tcp set global autotuninglevel=normal and hit enter
5. Now again type, netsh int tcp set global netdma=enabled and hit enter
6. After that, type netsh interface tcp show heuristics and hit enter
7. Now, again type netsh interface tcp set heuristics disabled and hit enter
8. After that, type exit and press enter
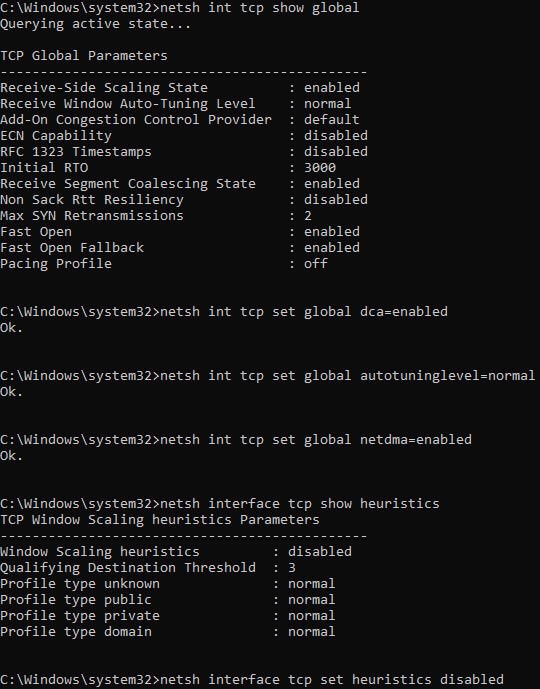
Now this command line is complete, now move to the second method
Method 2: In this method, we use flush DNS configuration to clear cache of local DNS.
DNS cache stores the location of web server that contains the web pages which you recently viewed. If the location of web server changes before update of DNS cache then you can no longer access the web pages. So we need to clear DNS cache which no longer requires.
1. Open up command prompt as administrator again.
2. Type ipconfig/flushdns and hit enter and then close cmd.
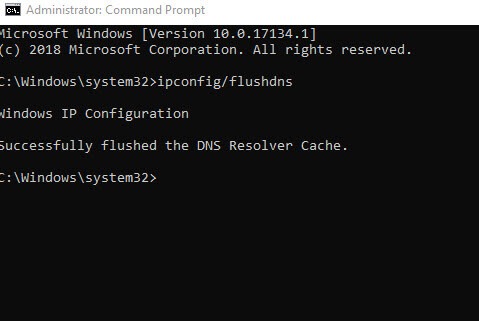
Method 3: In this method, we use a command line script to reset the windows network socket.
Winsocket is a technical term which defines how network software should access network service. Generally, we use winsocket reset when any network problem happens after malware attack or access only certain web pages or any type of network error occurred in our computer.
1. Open the cmd again as administrator
2. Type, netsh winsock reset and press enter
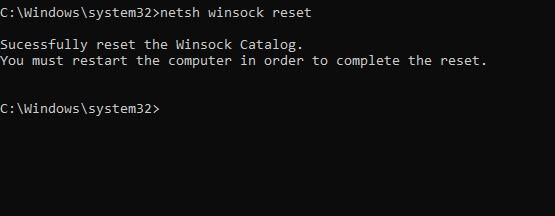
3. Now type, netsh int ip reset c:\resetlog.txt and press enter
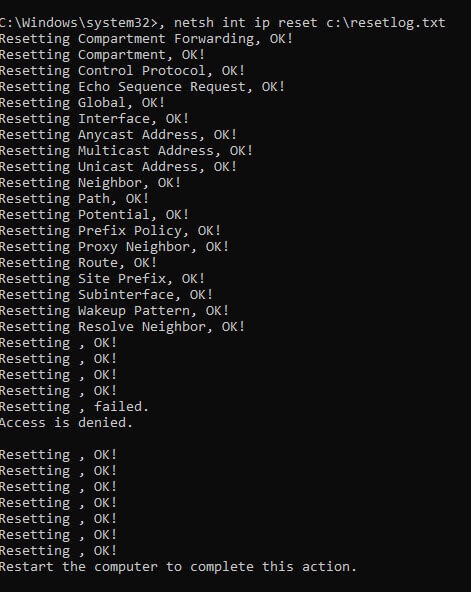
4. Restart your PC to complete the process.
Method 4: speed up internet connection by using pinging service for continuous reply from your default gateway.
A default gateway serves as an access point that a networked computer uses to send information to a computer in another network or the internet. Ping is helpful to determine the TCP/IP address as well as any network issue.
1. Open command prompt as admin
2. Type, ipconfig and hit enter
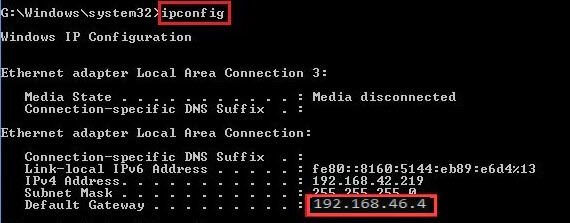
3. Now command prompt show your Default gateway address
4. Type, ping –t <your Default gateway address>
5. Example: – ping –t 192.168.46.4 and hit enter.

Note: the pinging service increase internet by continuously reply from your default gateway address so don’t close command prompt minimize it. You can use this method on a daily basis if you think this method work for you.
In the above methods, we only talk about to improve internet speed by using command line script. Now move to some other network configuration
How to improve internet speed by using Local Group Policy Editor
Windows reserved some bandwidth for windows updates or other services of windows but we can disable the default reserved bandwidth and use overall bandwidth to increase internet speed for our work and
we can specify the maximum limit of outstanding packets to increase the number of outstanding packets permitted on the system.
When the number of outstanding packets reaches to the windows default limit which is very minimum, the Packet Scheduler postpones all submissions to network adapters until the number falls below this limit. So we will increase the outstanding packets, so the internet not get interrupted.
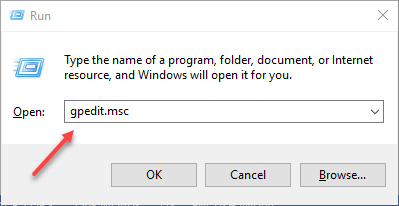
1. Press windows + R key to open Run command and type gpedit.msc and press enter.
2. On the left side expand Administrative Templates
3. Now, expand Network and then, click on QoS Packet Scheduler
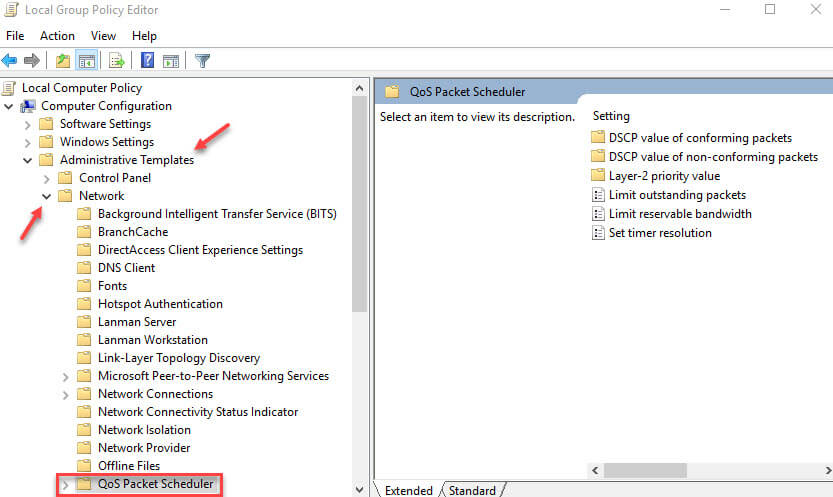
4. And on the right side double click on Limit reservable bandwidth
5. Now, select option Enable and set Bandwidth limit (%) to 0 and click on Apply button
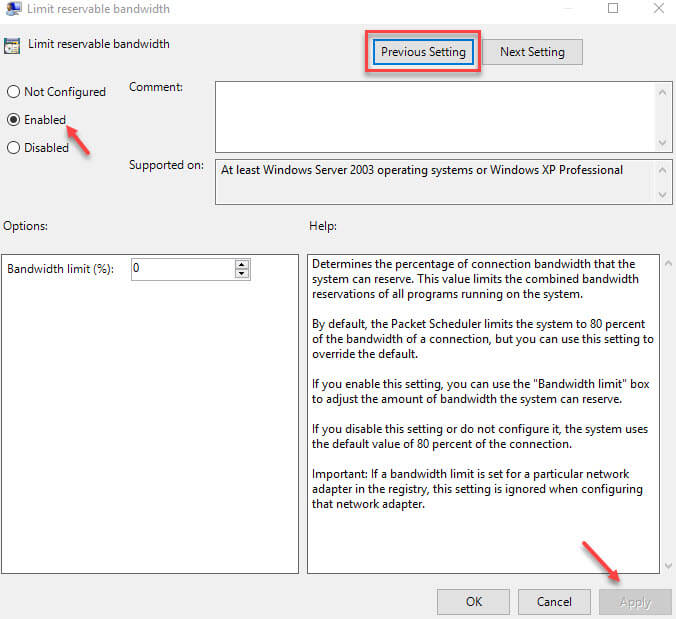
6. After that click on Previous setting on the top side
7. Now you are in Limit outstanding packets click on Enable and set the number of packets to 4000000000 (4 and nine zeros) then click on Apply and OK
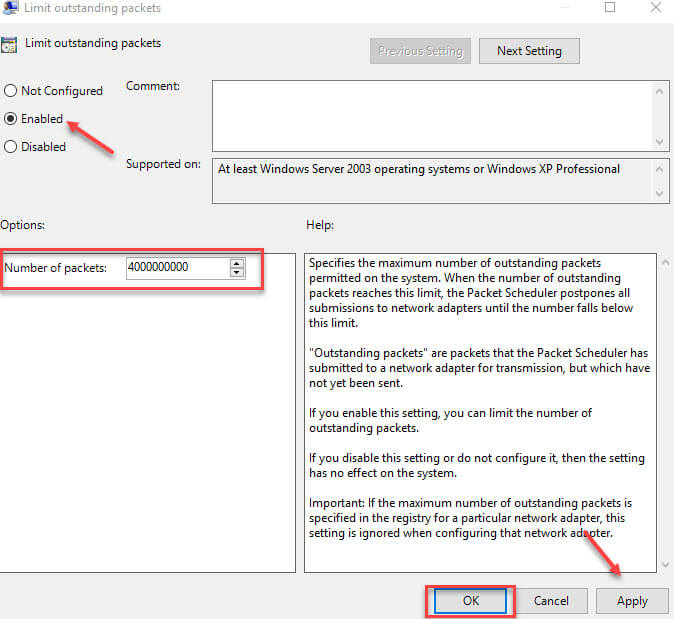
8. Close the group policy editor
How to speed up internet by adding fast DNS Server Address
By default, Windows uses default DNS Server Address but we can change it to other DNS Addresses and check whether internet speed is increased or not, some DNS server address is very fast so maybe your internet speed is also be increased.
1. Go to your control panel by typing in search box
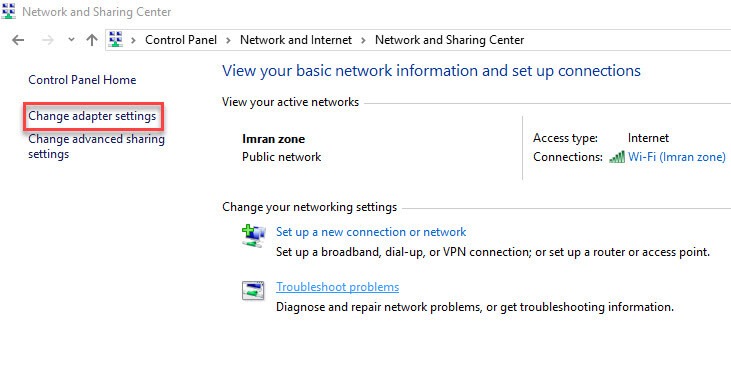
2. Now click and open Network and sharing center
3. On the right side click on change adapter setting
4. Right click on your Active internet connection (Ethernet or wifi) and choose Properties
5. You see a list of network configuration double click on Internet Protocol Version 4 (TCP/IPv4)
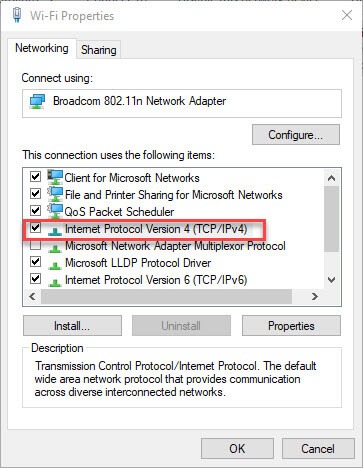
6. Then, select Use the following DNS server addresses
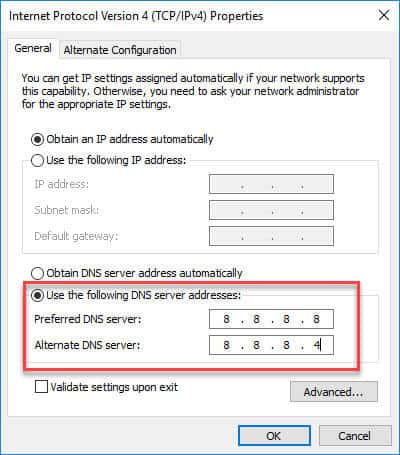
I give you these two fast DNS Server but you can also change it according to your internet speed with the help of this list of different DNS Server Address.
For Google public DNS Server Address, use below DNS server and type the number accordingly
Preferred DNS Server: 8.8.8.8
Alternate DNS Server: 8.8.4.4
OR
For OpenDNS Server Addresses, use below DNS server and type the number accordingly
Preferred DNS Server: 208.67.222.222
Alternate DNS Server: 208.67.220.220
7. After selecting DNS click on OK
Boost internet speed by disabling and limiting windows 10 Automatic updates and Microsoft services
Disable windows updates through services
If you want to download windows updates manually and want to use overall internet speed for your work then you definitely disable the automatic updates because these updates running in the background and consume a huge amount of data.
1. Go to windows search box and type Services and open it.
2. Now find a service called Background Intelligent Transfer Service (BITS) and double click to open
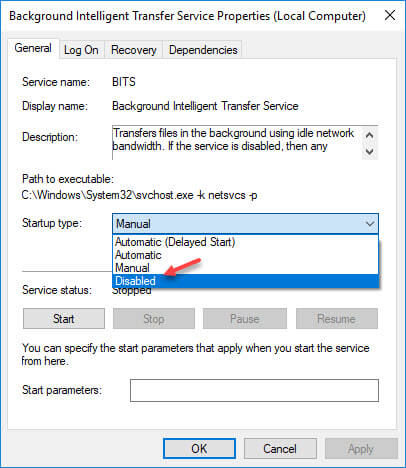
3. Now select Disable option under startup type then click Apply and OK.
4. After that scroll down and find windows update double click on it stop and Disable it, click on Apply and OK
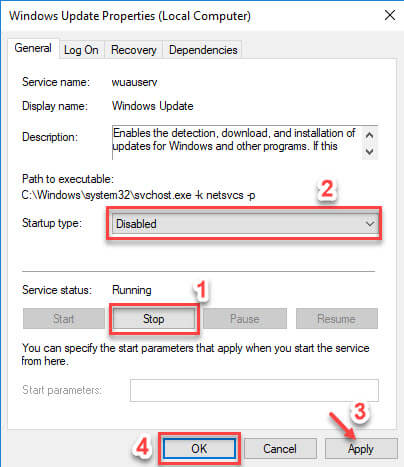
5. Now close the services
After disabling the above services, automatic windows update will be disabled if you want to enable it so follow the above steps again and enable all disable option.
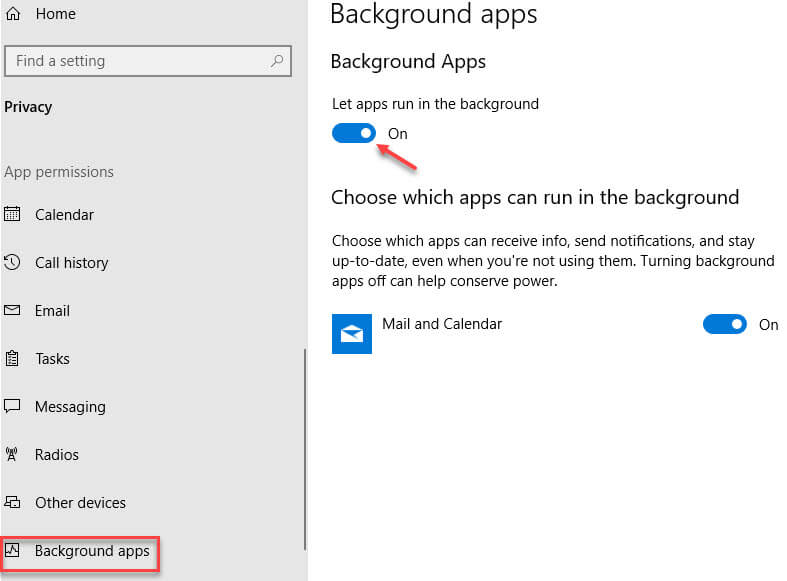
If you also want to disable windows background apps then (Go to settings < select Privacy option < on the left side scroll down and select Background Apps and Disable background apps which you want).
Set metered connection for your internet to limit the background apps, services and settings
If you have limited internet connection and your mostly internet used by your background services then you need to limit your internet for background services and apps.
1. Go to your taskbar and click on the Wi-Fi icon and click on the property of the internet you are using.

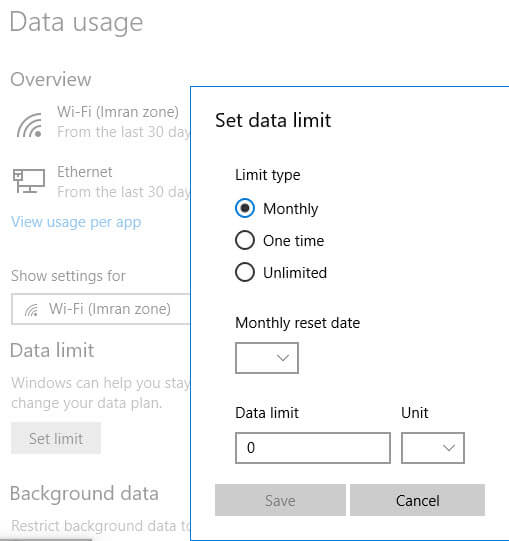
2. Now, you move to settings click and ON your Metered connection and click on Set a data limit to help control data usage on this network option
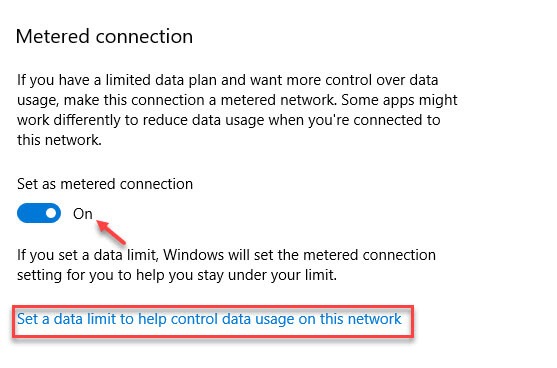
3. Now, if you want to set limit then choose your limit type and Data limit
4. If you want to restrict background data so select Always option in background data
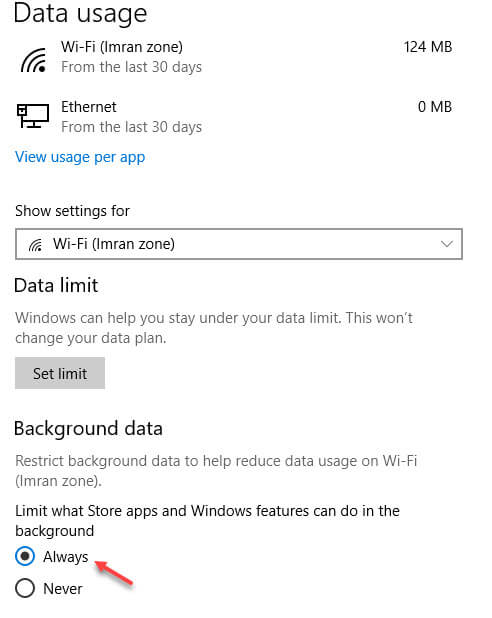
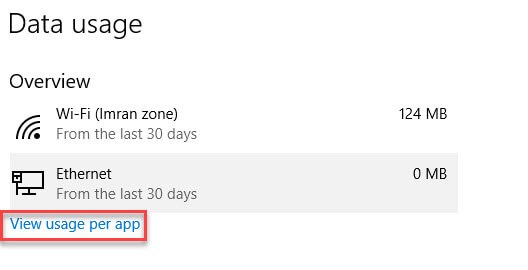
5. And if you want to see which app using your data in background then select above option View usage per app and then you will see which app using your internet in the background.
Disable and limit all windows update advance options
In these settings, we disable all windows update advance option and settings to save internet data
Note: – if you don’t want any windows update or app update in background then you follow the below steps, but remember these settings limit or stops your windows updates and Microsoft updates in future, so anytime you need to windows updates or something related to Microsoft apps updates then you must change the settings to default .
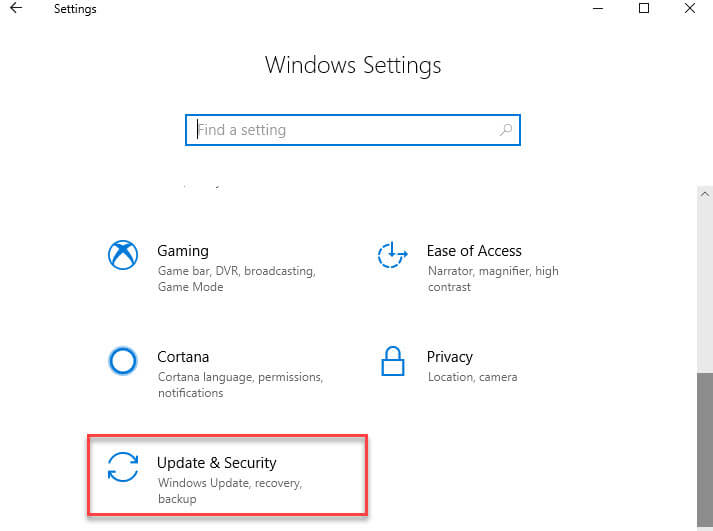
1. First, go to Settings and click on Update & Security
2. Now, in windows update tab click on Advance option
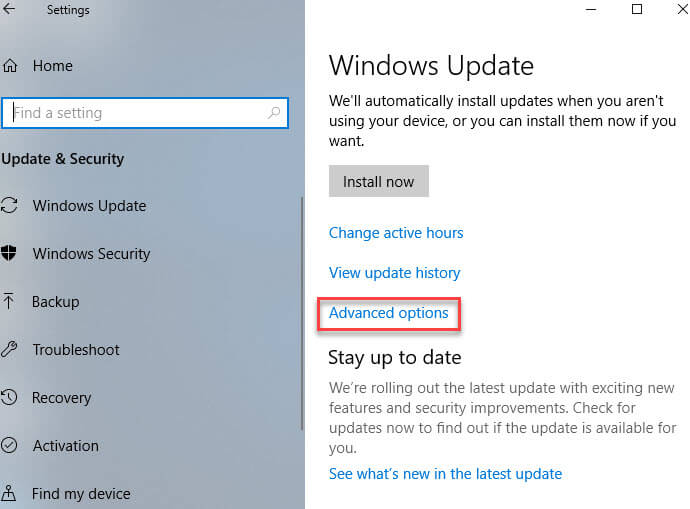
3. After that, Disable all the settings of Update option
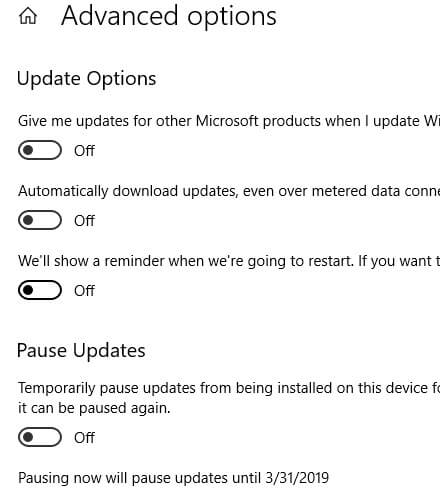
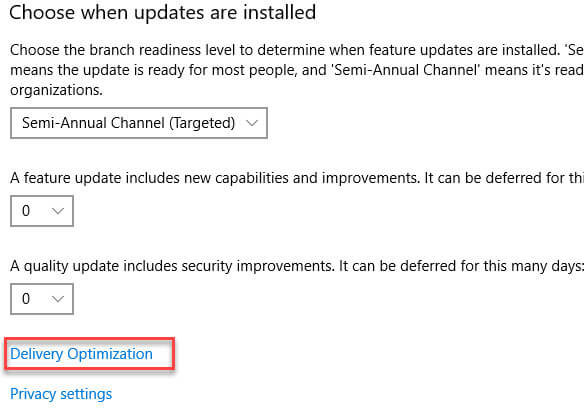
4. Now, click on below Delivery optimization option
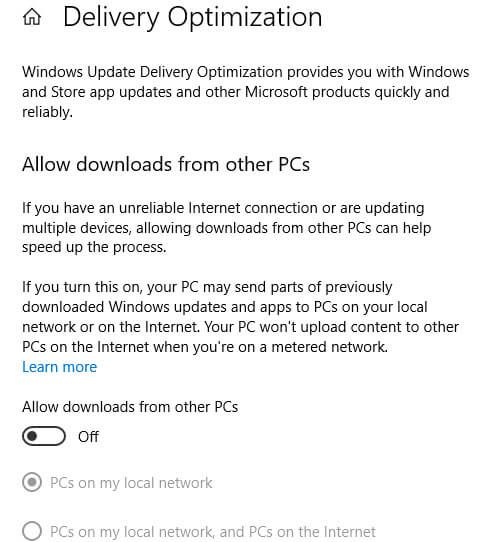
5. Turn off the Allow download from other PCs
6. After that, click on below Advance options
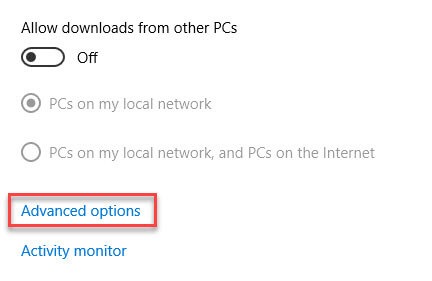
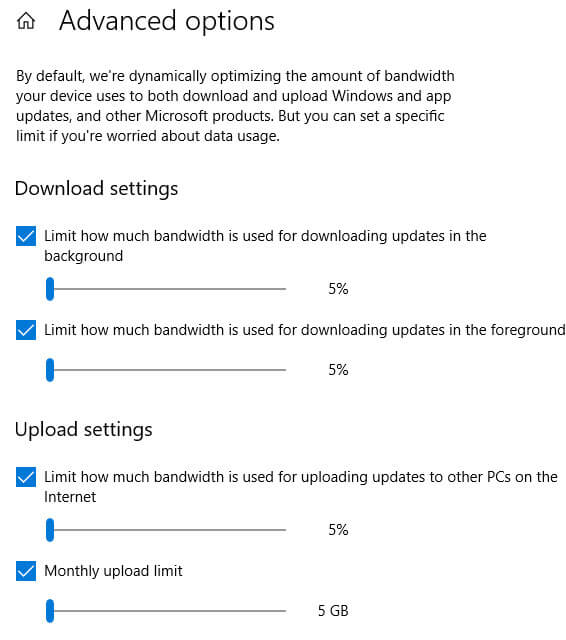
7. Now you will see the list of Download settings (By default all these settings use your bandwidth for download and upload windows and app updates and other Microsoft products, you also read the above instruction)
8. We need to limit all these settings to minimum so that only a very small amount of bandwidth used by these settings
9. Set all settings to minimum which is 5%
After Applying the above methods or the settings If you find that something wrong with internet speed or some settings not work for you then anytime follow the above steps again and change the settings and configuration to default.
Conclusion
Fast internet connection is necessary for our busy work and I showed and explain different methods and configuration to make your internet faster in windows and I will definitely sure that these tested methods work for you.
Tell us, which is your best method to make internet faster in comments.
And if you like this post or you find this post is helpful for you so don’t forget to share

